Detailed instructions for running Farcaster node


As a highly anticipated project when competing with Lens Protocol, Farcaster also received a lot of appreciation from the community when converging many potential elements to be airdropped. Let's learn how to set up and operate a node on the Farcaster network.
Potential of Farcaster project
Farcaster is a unique decentralized social network, built on the Ethereum blockchain , providing a new and safe social networking space for users. Farcaster's highlight is its decentralized structure, allowing users to have maximum control over their data and content.
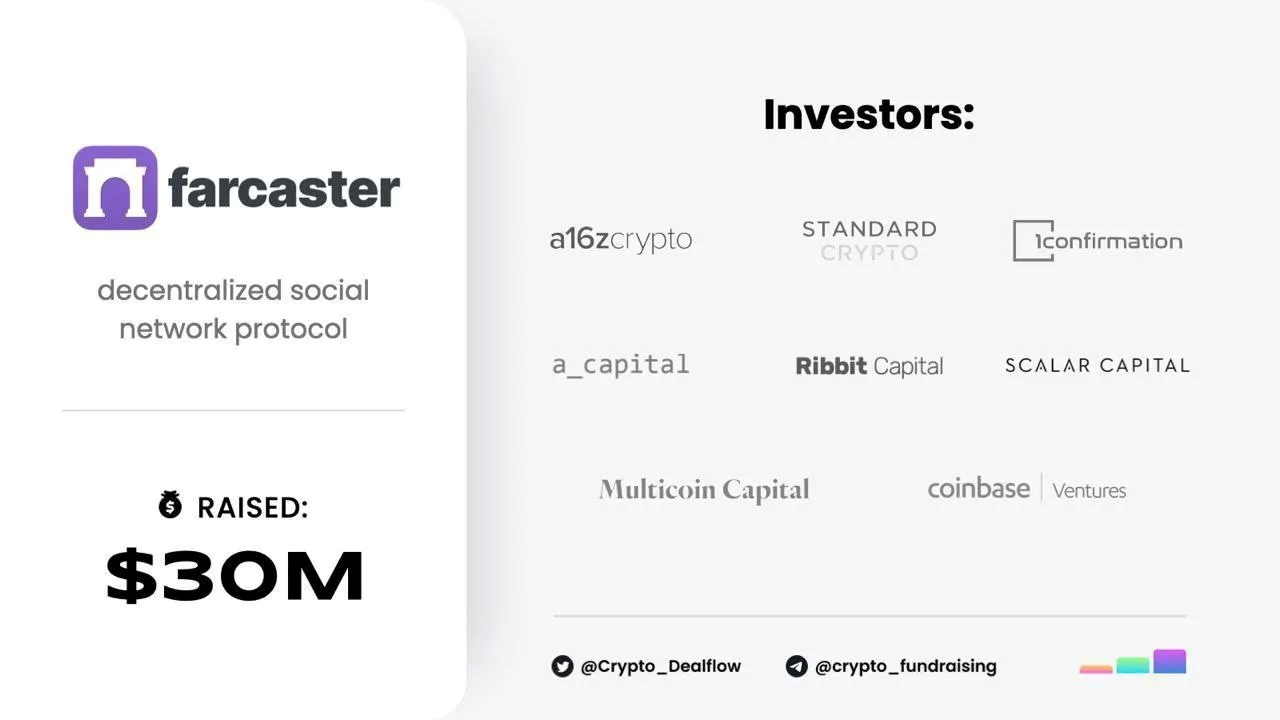
The Farcaster project received attention when it attracted $30 million in investment led by A16Z. This investment round also includes famous names in other circles such as Coinbase Ventures and Scalar Capital. This investment capital provides financial resources for Farcaster, supporting the development and expansion of the project.
The project has announced the Warps token, an important part of their ecosystem. This token is mainly used to pay for services on the platform. The special feature of Warps is the distribution: every week, Farcaster creates a reward "pool" with a total of 10,000 Warps, divided equally among all active nodes on the network.
Although specific details about the applications and uses of Warps are currently limited, other than being used to pay for services, the community is looking forward to the possibility of a future airdrop from Farcaster. This can bring significant benefits to those running Node and actively participating in the system. With the launch of Warps, Farcaster is not only expanding engagement on its platform but also creating a new rewards channel, incentivizing participation and contribution to its network.
Instructions for running Farcaster node
Prepare VPS
To run node, you need to prepare VPS. VPS can be purchased on sites like contabo.com or vultr.com.
Minimum VPS configuration to run node:
- 8 GB of RAM.
- 2 CPU cores or vCPUs.
- 20 GB free space.
Download Warpcast
You download Warpcast here . Then create an account and use it like a normal social network. You should post regularly to have a chance to receive airdrops. (Creating an account will cost a fee of 299,000 VND).
Then, get the FID on Warpcast to prepare to run the node.
Step 1: Go to your Warpcast account.
Step 2: Go to your personal page.
Step 3: Get the FID in the About section as shown below.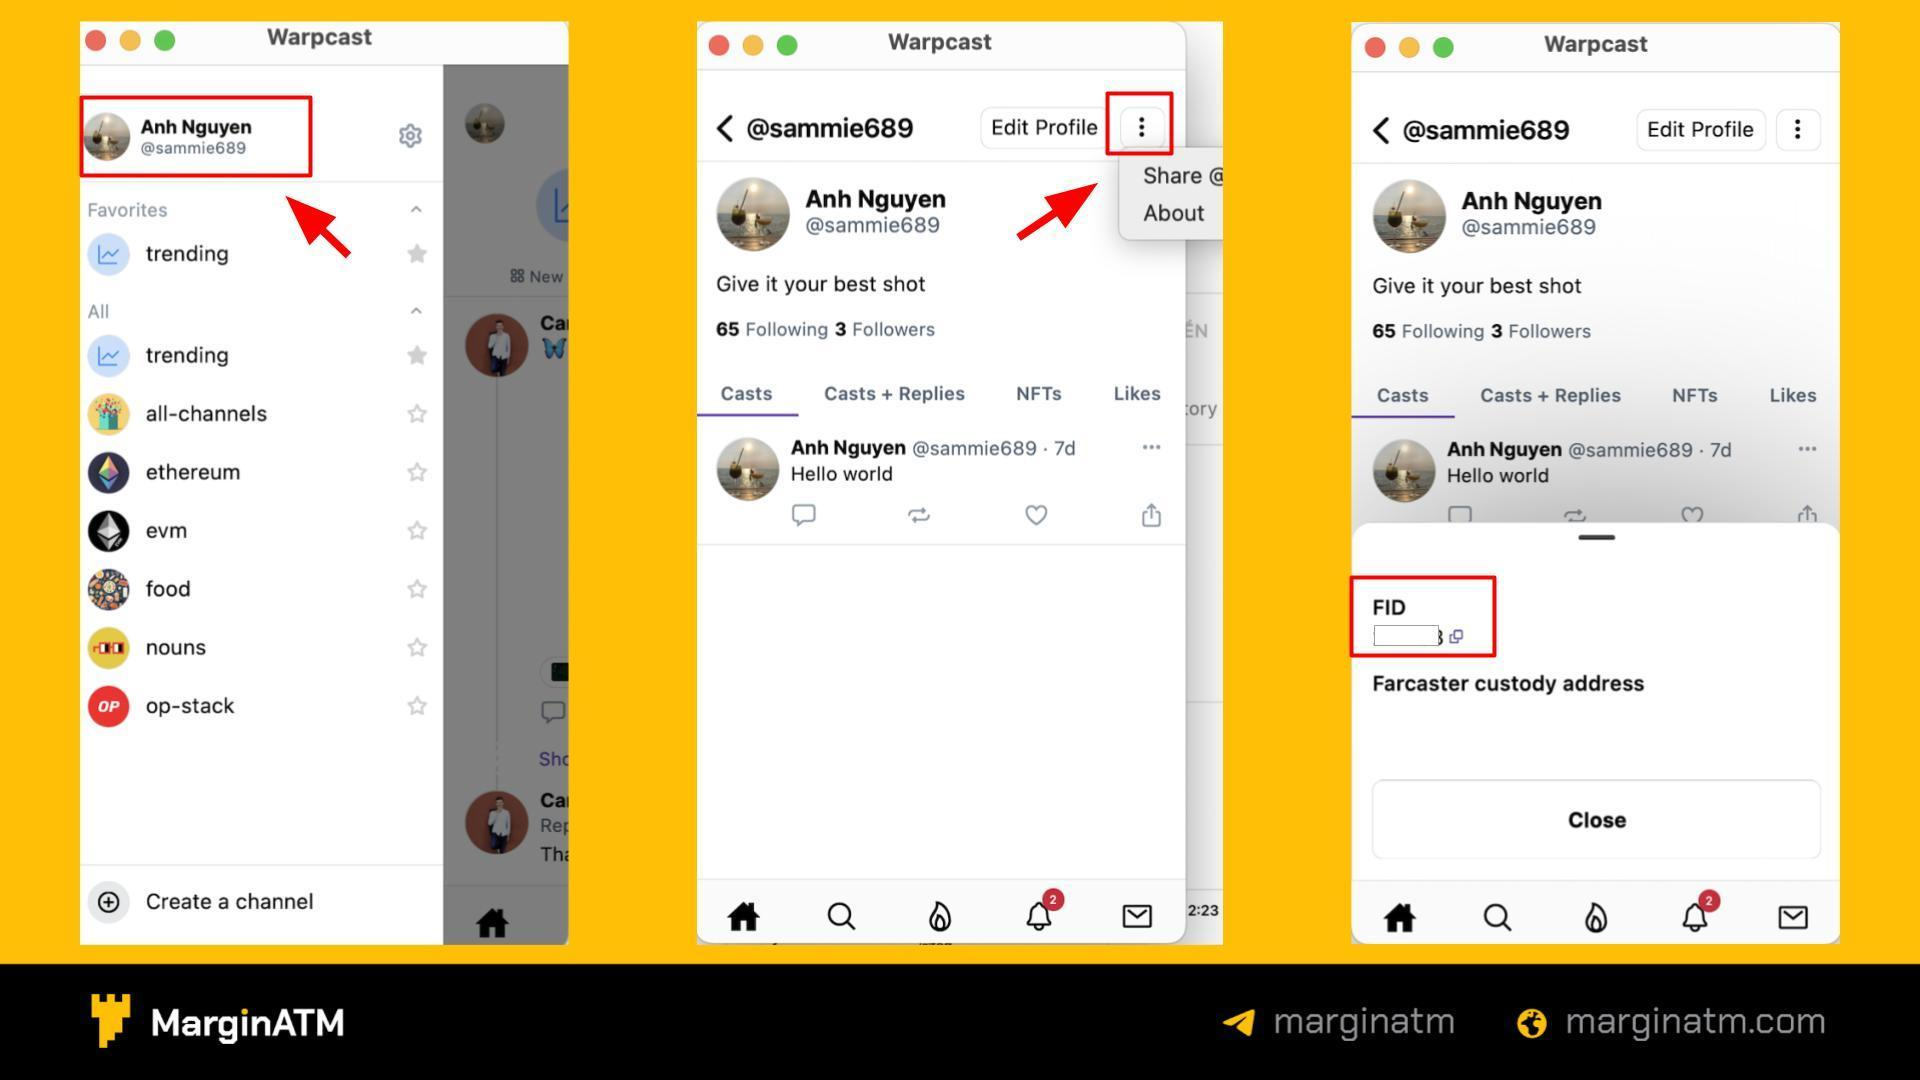 Steps to get FID on Warpcast.
Create APIs
Step 1: Visit Infura , create an account. Click on “Create New API Key"
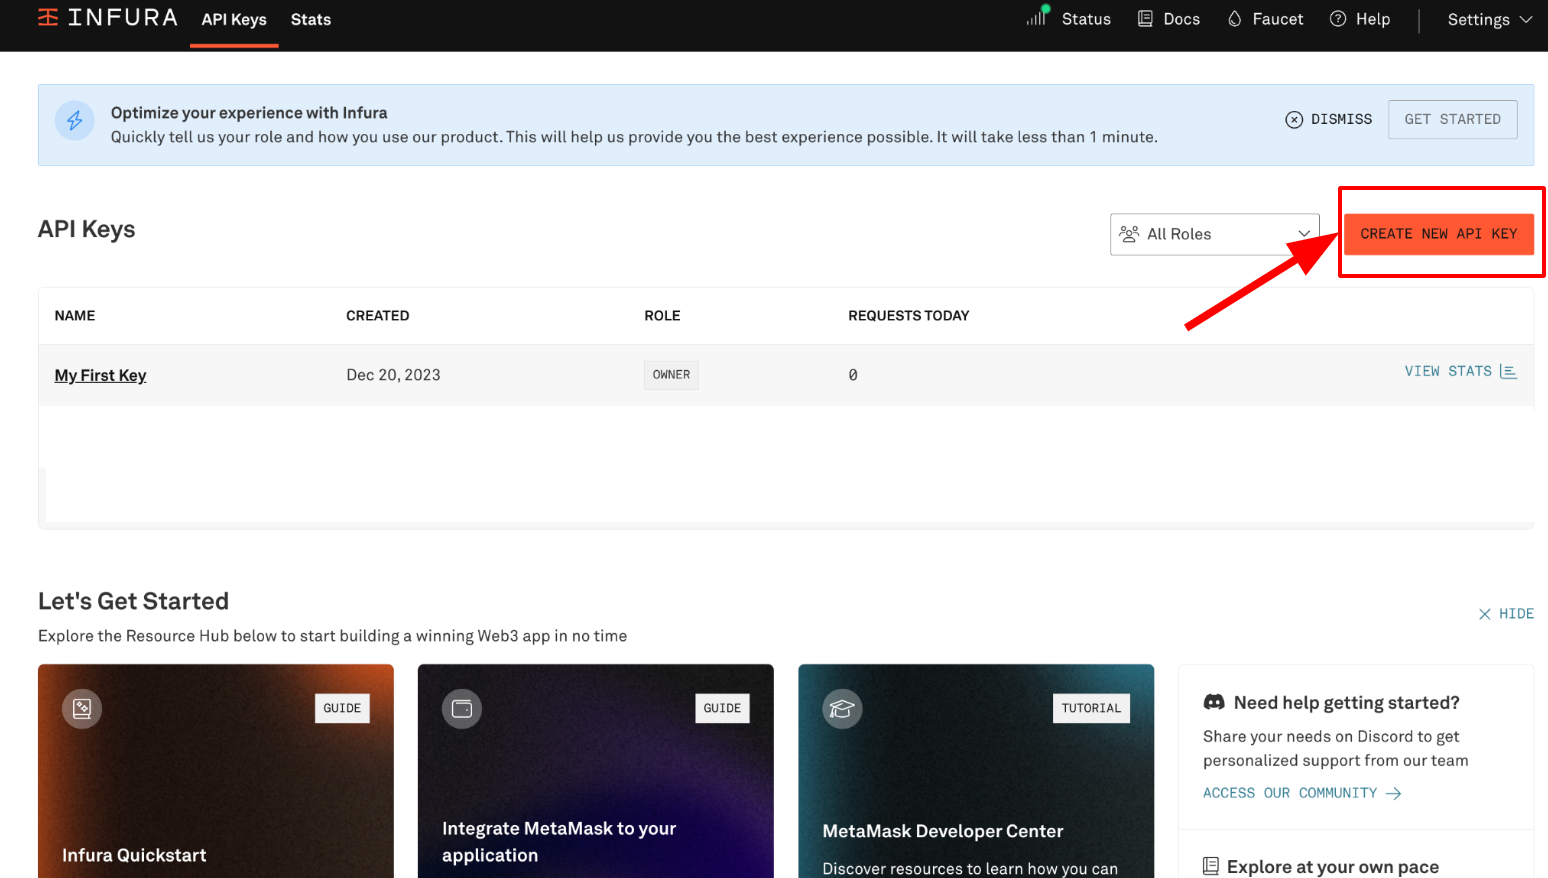 Click to generate API Key.
Step 2: Select Ethereum Mainet and Optimism mainet then select "Save Change"
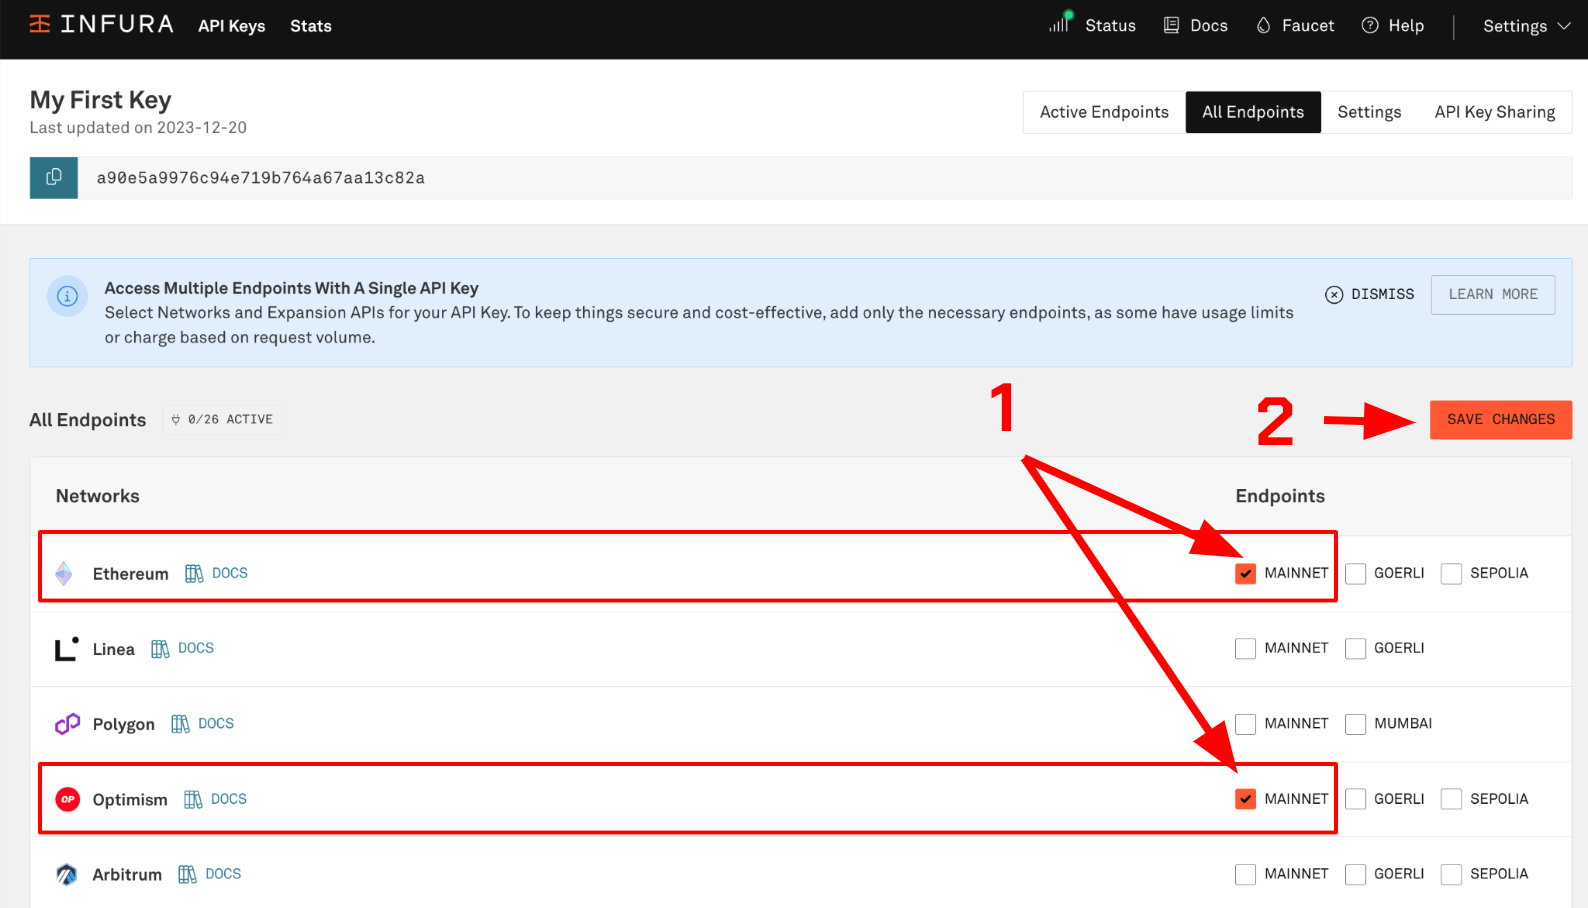 Select Ethereum Mainet and Optimism mainet.
Step 3: After pressing save, switch to the Active Endpoints tab and the API copy of both Ethereum mainnet and Optimism mainnet will appear.
 Save the newly created API.
Please copy both the Ethereum mainnet and Optimism mainnet APIs to prepare for the next step.
Chạy node Farcaster
Go to Terminal, log in to VPS. Next enter the following commands one after another:
- sudo apt install screen -y
- screen -S Hubble
- curl -sSL https://download.thehubble.xyz/bootstrap.sh | bash
A screen will then appear asking you to enter the Ethereum mainnet API, Optimism mainnet API and the FID obtained above. After entering, wait until it finishes running.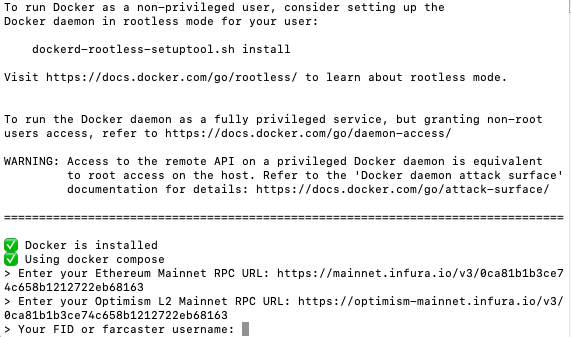 Enter Ethereum Mainnet RPC URL, Optimism Mainnet RPC URL, FID.
To reopen the node, use the command:
- screen -r Hubble
If you see that the node is not running, use the command:
- cd ~/hubble && ./hubble.sh upgrade
summary
At the end of this tutorial, I hope you have mastered the steps to set up and operate a Farcaster node effectively. If you have any questions or need further assistance, don't hesitate to contact the MarginATM community.
Read more: What is Farcaster? Complete information about the Farcaster project.
**Not financial advice.


![[ℕ𝕖𝕧𝕖𝕣] 𝕊𝕖𝕝𝕝 𝕐𝕠𝕦𝕣 𝔹𝕚𝕥𝕔𝕠𝕚𝕟 - And Now What.... Pray To The God Of Hopium?](https://cdn.bulbapp.io/frontend/images/79e7827b-c644-4853-b048-a9601a8a8da7/1)


![[LIVE] Engage2Earn: auspol follower rush](https://cdn.bulbapp.io/frontend/images/c1a761de-5ce9-4e9b-b5b3-dc009e60bfa8/1)