BASIC CERAMIC SHAPING METHODS 1- PINCHING

BASIC CERAMIC SHAPING METHODS 1: PINCHING TECHNIQUE
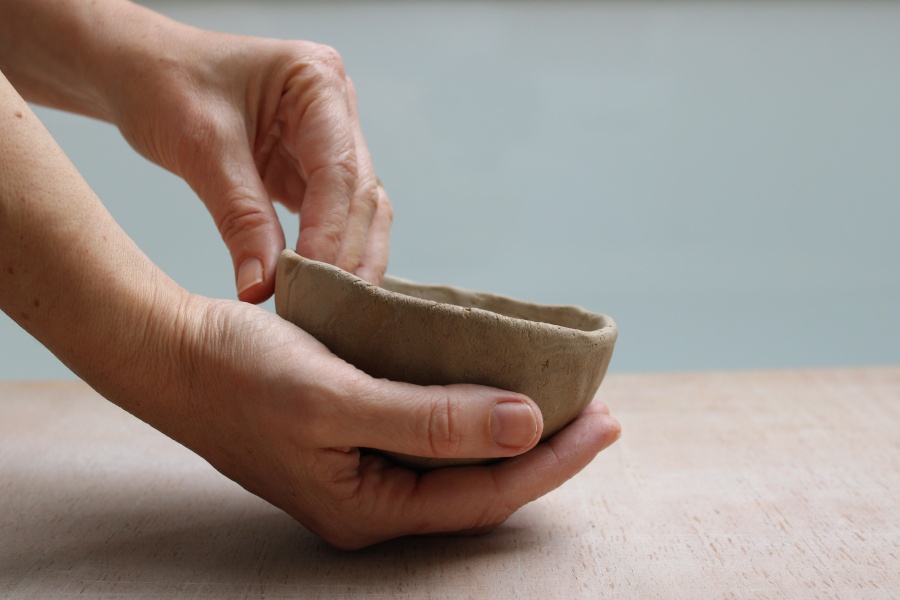
The pinch technique is a fantastic way for beginners to get acquainted with working with ceramic clay. The most important aspect of this technique is the absence of any tools between your hands and the material, serving as a reminder of the fact that your hands are indeed wonderful tools.
WHY THE PINCHING TECHNIQUE?
People have been making pottery using the pinch technique probably since they discovered they could dig. Vessels made using the pinch technique dating back to around 17,000 years ago have been found in China. What started as a basic method to fulfill fundamental needs like making containers for food and drink has evolved into one of the fundamental shaping techniques.
Is this really the best way to get accustomed to clay shaping? Does limiting beginners to making simple pottery discourage them from exploring more sculptural figures? Does it hinder creativity? The pinch technique is, in fact, a crucial skill. Making a pot using the pinch technique is not just about making pottery; it requires a significant focus on details and attention. It helps beginners develop essential skills needed to explore more creative ways of working with ceramics. The pinch technique will help you understand the consistency of the clay and how to control it. Most instructors start with the pinch technique to develop sensitivity to the material and its working properties, providing an understanding of ceramic clay. It is a relatively simple technique because you handle the material instinctively, but perfection still requires practice.
The key element in this method is learning to think about the inside and outside of a form together. The importance you give to the inside of an object and the actions you apply are equally significant as the external influences. This is not just a lesson in ceramics; it's a life lesson.
Pinching also teaches tactile sensitivity. Throughout this process, you learn to rely on your fingers to provide information about the clay. You also develop a kinetic awareness of the thickness of the walls and floors. This tactile awareness can enhance your ceramic skills in various areas.
Beginners often pinch too hard and too fast. This results in forms being too wide or thin and may cause the form to collapse. This can be frustrating. Controlled work is essential to maintaining the form. If you pinch without thinking about how the clay will react and where it will move, you lose control. An exercise for beginners is to close their eyes and pretend their eyes are at the tips of their fingers. This encourages focus, slowing down, and thoughtful consideration of the material.
WHAT CAN YOU CREATE WITH THE PINCH TECHNIQUE?
The pinch technique is typically used to make small vessels, most of which are less than 15 cm in diameter, but larger pieces are also possible. This technique is not limited to vessel shapes; whistles and pipes are often made using the pinch method. Sculptural forms are also possible. Making small animal figures with this technique can be particularly enjoyable. Once mastered, the pinch technique can be used to create ambitious forms or to combine multiple pieces to make hollow sculptures.
PRACTICAL TIPS FOR WORKING WITH THE PINCH TECHNIQUE
- Stoneware clays are relatively stronger and maintain their shape well without cracking, making them a good choice for beginners using the pinch technique. As you gain experience and better understand how the clay behaves, you can switch to finer, softer alternatives to create thinner products.
- If you prefer not to work with stoneware clay, try mixing a smooth clay at the same firing temperature - it will maintain strength but will have a better surface quality.
- One of the major problems for those working with the pinch technique is nails - they can leave marks on the clay and are often a problem while working with the material. Work with short nails.
- Warm hands dry out the clay quickly, which can be problematic in pinching as it may lead to cracking. Cooling your hands periodically under cold water and working as quickly as possible can solve this issue.
- With this technique, a small amount of clay can be shaped over an extended period. It's generally not suitable for very large quantities - as you gain experience, you'll find you can increase the amount of clay you use. Start with an amount that comfortably fits in your palm and, if you want to replicate a shape, weigh your clay before starting and keep a record for the next product.
- If deep cracks appear while working, they can be immediately fixed by using a small amount of slip. Small surface cracks can be left as a textured effect.
STEP-BY-STEP GUIDE TO THE PINCH TECHNIQUE:
- Take a small, well-kneaded amount of clay and form it into a smooth ball that fits in the palm of your hand - be sure to weigh it if you want to make several products of the same size.
- Press your other thumb down into the center of the clay until you feel some resistance.
- Use your fingers and thumb to pinch from the bottom to compress the shape. Turn the clay in your hand, using rhythmic movements, to even out the marks as you thin the wall.
- Work by bending your thumb to prevent the mouth from opening too quickly. At this stage, it is essential to keep the mouth thick and closed as much as possible. This will prevent rapid expansion of the wall, maintaining its shape and preventing tearing or cracking.
- Change the position of your hands so that your fingers are inside and your thumb is outside. Squeeze the wall upwards and outwards in stages. Achieve a uniform thickness throughout the form, then continue thinning a bit more in the same way.
- When you are satisfied with the form, begin fixing the mouth - work with small, balanced pinches between your fingers and thumb to thin as needed.
- Use a rib tool to scrape and smooth the inner surface to remove lumps and protrusions - hold the product in the palm of your hand while working. A rib tool cut from a credit card is perfect for this as it can be cut to the required size.
- If the product appears too saggy and is not holding its shape, use a hairdryer to dry the clay slightly from both the inside and outside.
- Place the product upside down on a board, then carefully scrape the outer surface with a metal rib to flatten the wall and remove all lumps and protrusions. Repeat with a rubber rib if necessary to make corrections.
- If you need to adjust the shape of the product, you can use a wooden spatula to shape the walls.
- The mouth of the product is crucial because it directs attention to the rest of the form. It is the first thing you notice, so it is crucial to have a well-finished mouth to balance with the rest of the form. This doesn't necessarily mean the mouth should always be thin; organic, unrefined mouths can suit many forms, but it should be in harmony with the function of the product.
These steps will guide you through creating a basic form using the pinch technique. Remember to practice regularly to refine your skills and develop a deeper understanding of working with clay.
Derek Weisberg, an artist who works with ceramics and also teaches at clay studios in New York, noted that pinch pots make for a good ice-breaker. He say ;
“Many students may be brand new to clay or haven’t made anything for a long time, so it’s a good reminder of how the material works. I also always tell my students to close their eyes and pretend their eyes are on their fingertips, It forces them to focus, slow down, and consider the material.”
Tutorial video;
References ;
- https://www.claycraft.co.uk/how-to/pinch-pots-for-beginners/
- https://www.thesprucecrafts.com/pinch-pots-101-2745972
- Lesser, Casey “why we’re still making pinch pots” 2019 https://www.artsy.net/article/artsy-editorial-making-pinch-pots