Software Defined Radio & Radio Hacking: Space Communications (Pt 3)
Spying on things that orbit the earth
This is multi part series. To catch up, read Part 1 and Part 2. Or find everything in our publication Radio Hackers.
As we’ve explored the world of Software Defined Radio, we started to explain some fundamentals around transmissions, antennas and receiving systems. It’s time to start putting these new pieces of knowledge to the test by looking at practical ways we can further develop these skills. In earlier articles, we promised a primer on space communications. Today, we deliver! But first, a quick update.
This series was far more popular than anticipated. Which we love, because it means there are plenty of inquisitive minds out there. Because of this, we’ve extended the series so we can focus on more in-depth tutorials around SDR over a longer time frame.
We’ve also launched a new publication where all these articles are posted, so you can streamline updates. Most of all, we’d love to hear about your journey. So if you’re using SDR we’d encourage you to share your journey by doing a write up and adding it to our publication. Contact us direct or drop a comment to arrange this.
The Status:
While exploring space-based assets can be pretty intriguing, it’s fair to say that if you’re a beginner to this world, the array of information to take in can be a little overwhelming. There’s frequency management, research of what to look at and where, as well as many other factors to be successful in your quest.
Today, we’ll look at intercepting communications from the International Space Station. To do this, we’ll have to look at ways to obtain orbital information, find out what frequencies and mode our target is operating with and put all that together to hopefully intercept either digital or voice communications from our space-based platform. Time to plan!
Planning the Event:
To successfully achieve our goal today there are a few critical pieces of information we’ll need. We need to know where our target is (location), when it will be there (timing), how we are to listen in on it (transmission mode) and where we are to listen to it (transmission frequency).
Our target, the International Space Station flies at altitudes of around 400 km above the earth in low earth orbit and moves through space at around 27,000 km/h. While you’ll typically find it will be in range for around 10 minutes or so as it orbits overhead, there’s a few factors that need to be accurate for this to be successfully intercepted. If you’re a beginner, it may take more than one attempt to pull this off, so be persistent.
Now we know what we need to give us the best shot at success, let’s look at how we obtain the data so we can get ready for our pass.
Orbital Information:
In the early days prior to the proliferation of computers and the internet, tracking space-based assets was a niche hobby due to the knowledge requirements of doing so. Over time, the implementation of applications and web interfaces has evolved to give us many pieces of information directly to our device of choice. This means that two of the factors we’ll need to gather information can be met by obtaining orbital information for the ISS over a particular area.
If we wish to do this on a mobile device, our recommendation it to use a mobile app like ISS detector. It’s available on both Apple and Android devices and will give you real-time orbital information as well as advanced future orbits a few days ahead of time. Find ISSDetector on the Play Store via this link.
If you’d prefer to use your laptop that has your SDR device connected you’ll need a computer-based tracking app. There’s an array of programs for doing so, but Gpredict works well for Linux and Windows. Find the Windows version here.
If you’re a Linux user, you can install it with the APT package manager with this command
apt install gpredict
Once we’ve got our orbital tracker up and running, we can look at it to extract our information that we’ll need to plan our pass. We can see that Gpredict will calculate our position, and then give us a forecast on both timing and orbital inclination relevant to that position. We can also receive mode and frequency information for our transponders, meaning that by implementing the correct tracking suite we obtain all the information needed for our our planning purposes.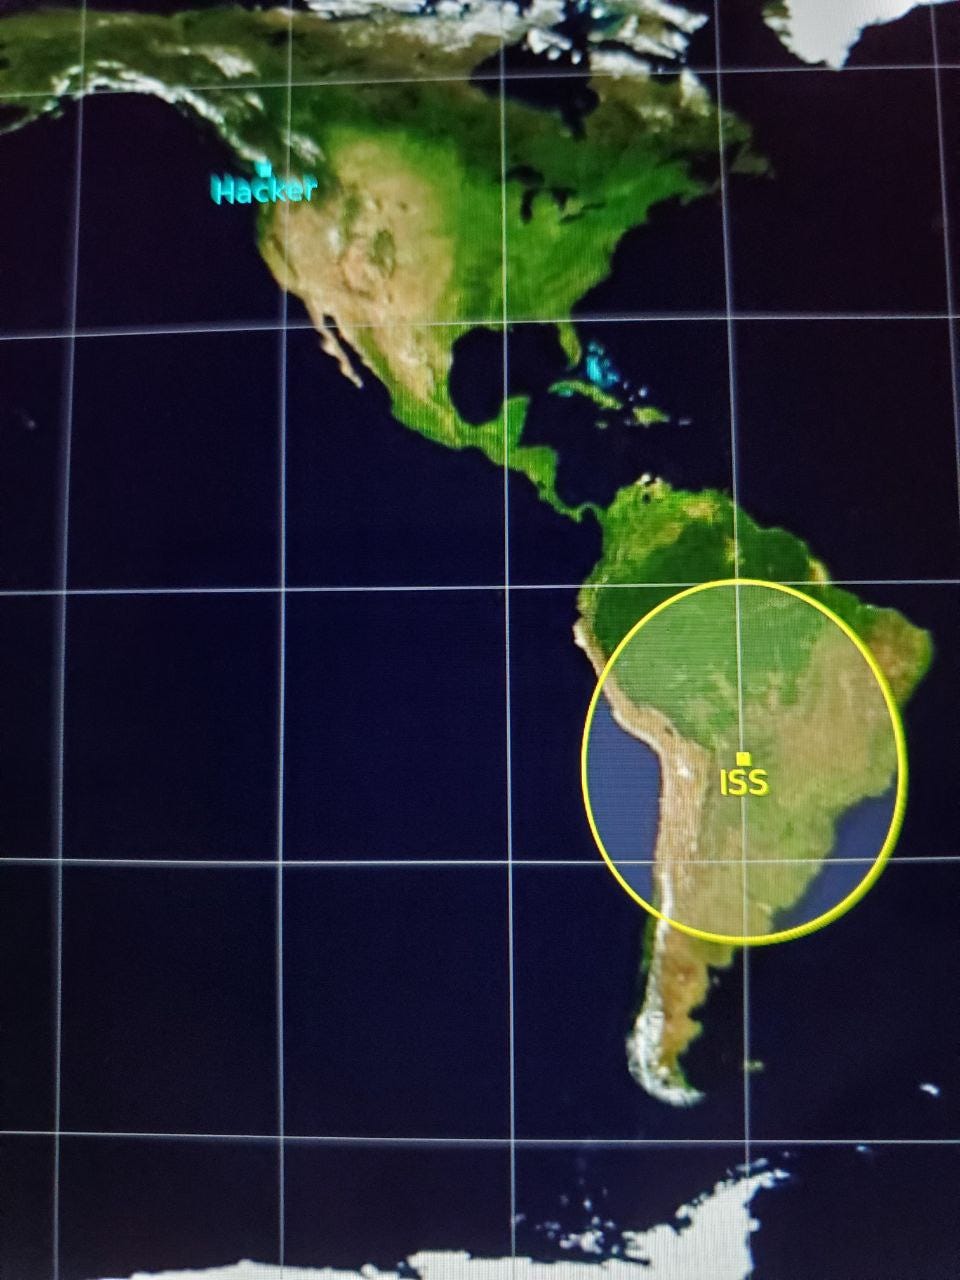
G-predict will do much of the math for you. Source: Author
One relevant point to consider is that inclination will partly dictate how well we receive our transmissions. An orbital inclination of 10 degrees, will provide far weaker signal strength and interception possibility than a 50 or 60-degree inclination. In the early days, while learning, it’s best to focus on the high inclination passes to make things easier as a stronger signal will always be far easier to intercept than something that’s further away.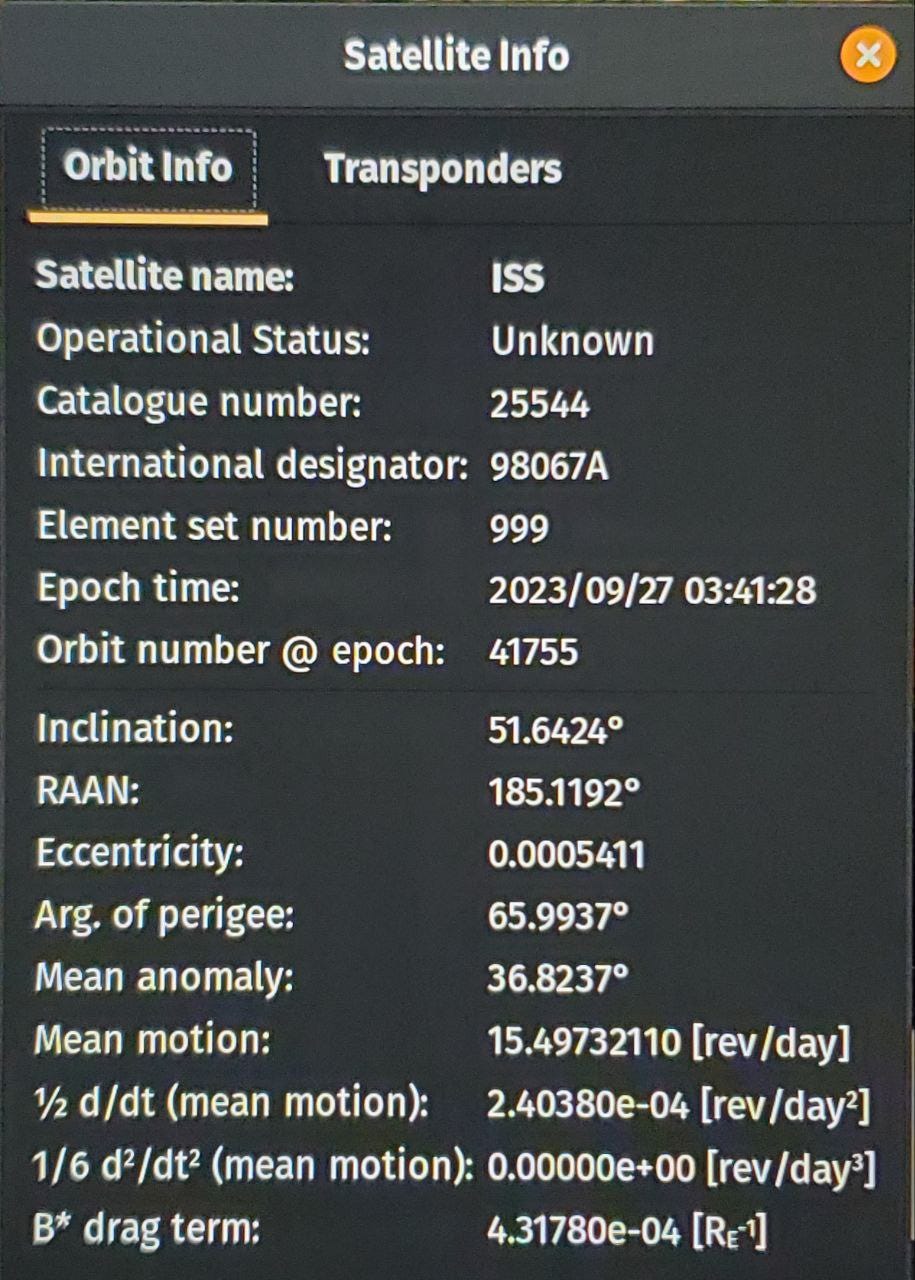
There’s a lot of information here, but you’ll only need orbital inclination and timing for now. Source: Author.
In our example calculations we can see our pass is going to peak at an inclination of 51 degrees at 0351UTC on the 27th. We’ve now obtained information for two of our goals. Where it will be. And when it will be there? Let’s look at obtaining what we need to meet our last two.
There’s a vast communications suite onboard but in the interests of streamlining things, we’ll focus on transmissions from the onboard Automatic Packet Reporting System (APRS) as we can then decode them later on using a plugin.
Transmission Types & Frequencies:
To achieve our last two requirements we need to know frequency information and type and we can obtain this from Gpredict as well.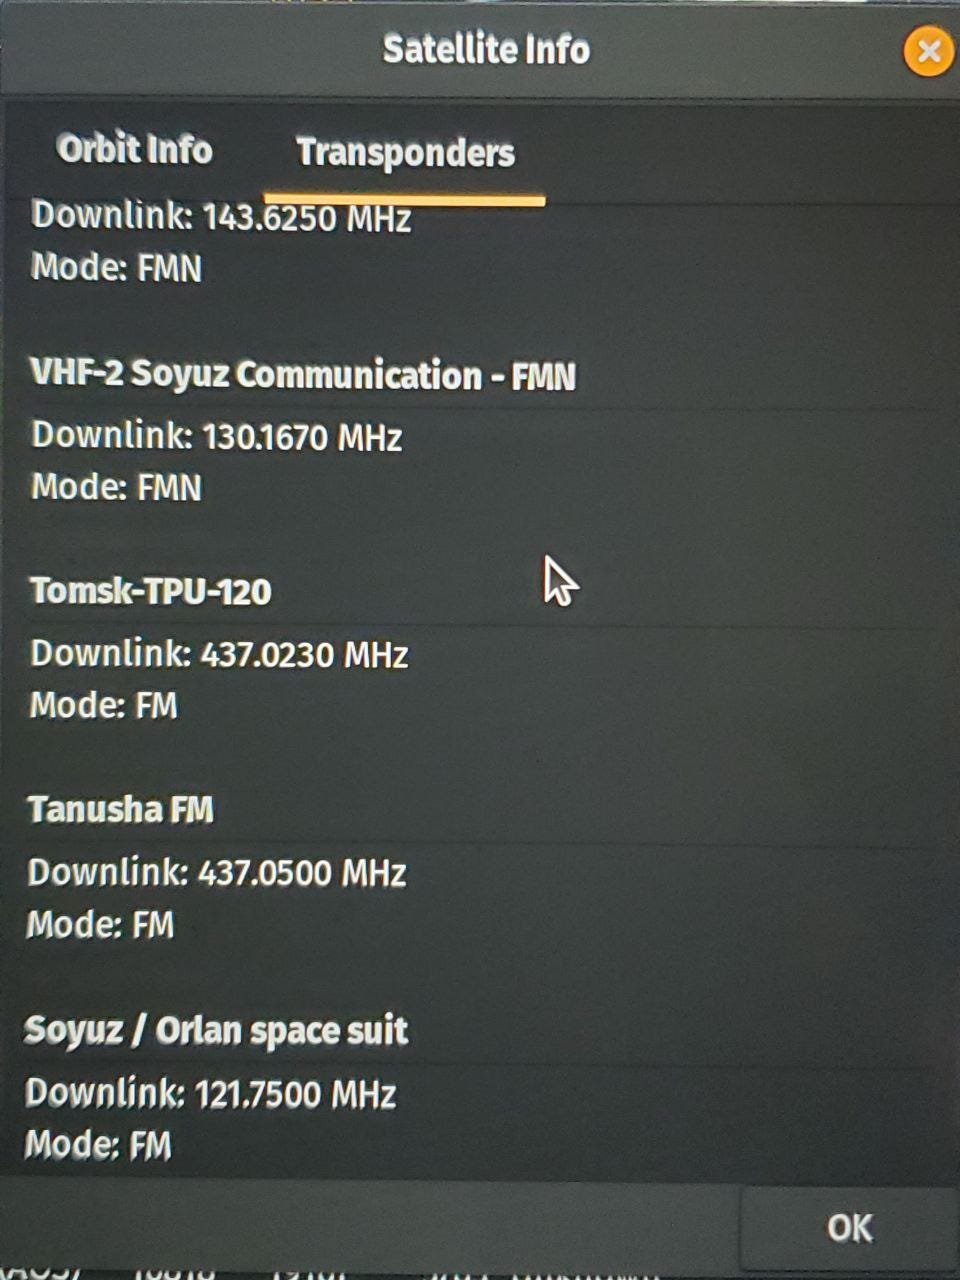
Frequency information is easy to find in your tracker of choice. Source: Author
As we see, there’s a vast array of types to explore. Feel free to experiment with your SDR dongle but for today we’ll be looking at Mode V APRS as mentioned.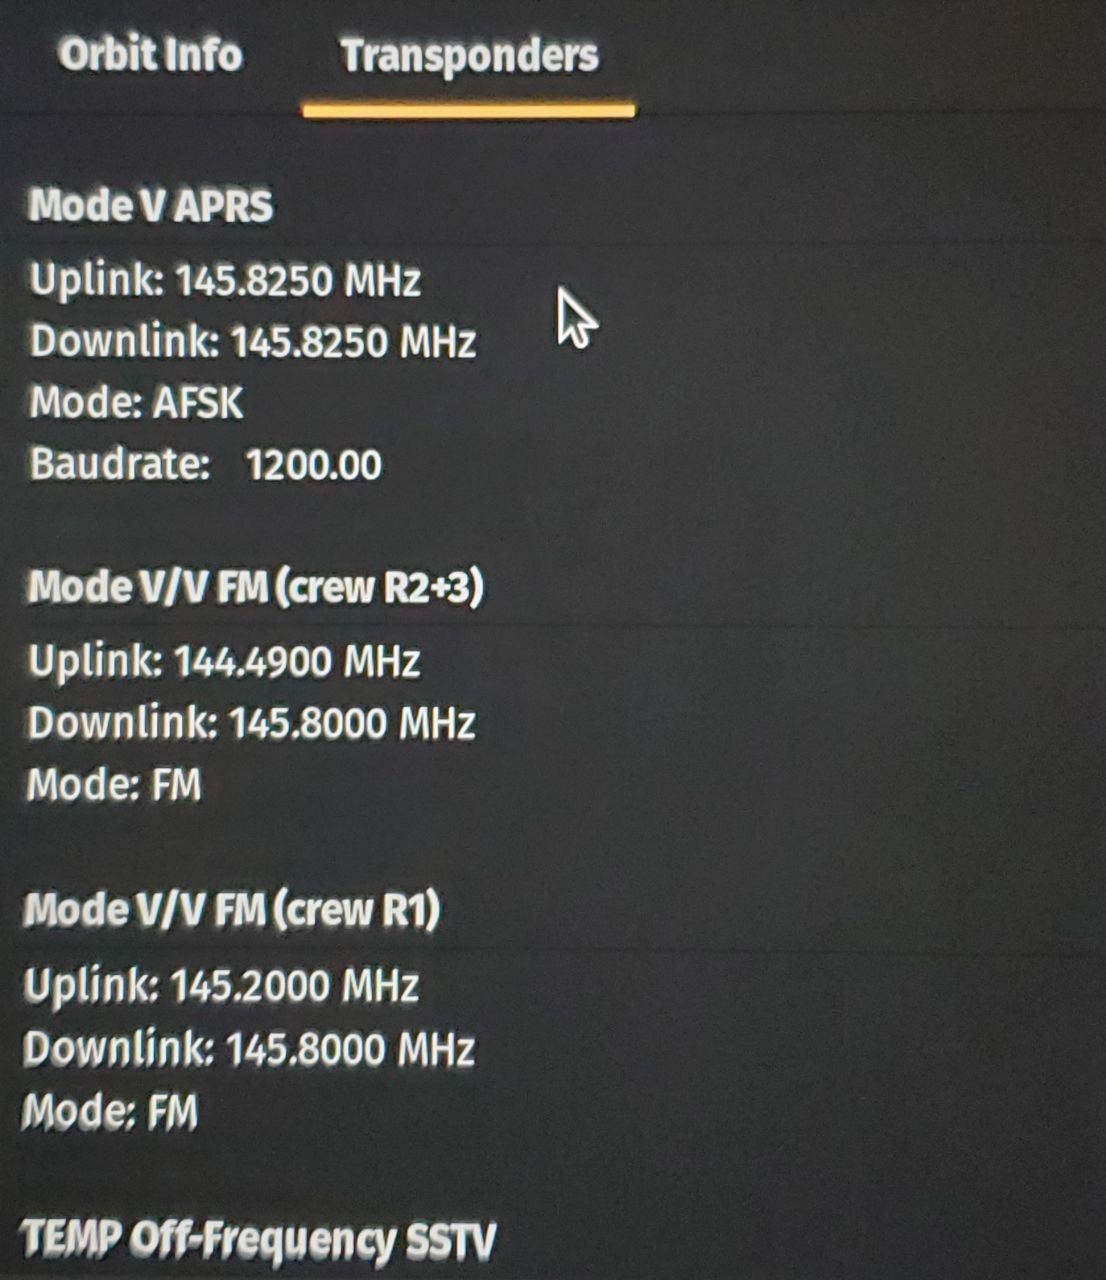
Mode V (VHF FM) is what we’re looking for. It’s there on 145.825mhz
We can see in our attached image that the APRS transmitter has a downlink of 145.825mhz, the middle of the VHF amateur band and uses FM modulation. We also note that there’s a baud rate there, as it’s a digital transmission. We’ll focus on decoding that later on, but this data gives us our transmission frequency and type.
So to clarify this, for successful interception of the APRS transmitter, we’ll need to tune our SDR to receive the downlink on 145.825 as well as keep our mode in FM as well. So when we’re configuring our SDR station to receive these transmissions, you’ll know what to look for when the signal pops up on the waterfall.
One Last Caveat:
One last item to check before you attempt your pass is the current status of the transmitter. Often, the system will be turned off during docking operations or maintenance periods, meaning that despite being overhead no transmissions will be heard. Mitigate this by checking the status of the station via this website. You can also find information via various social media accounts.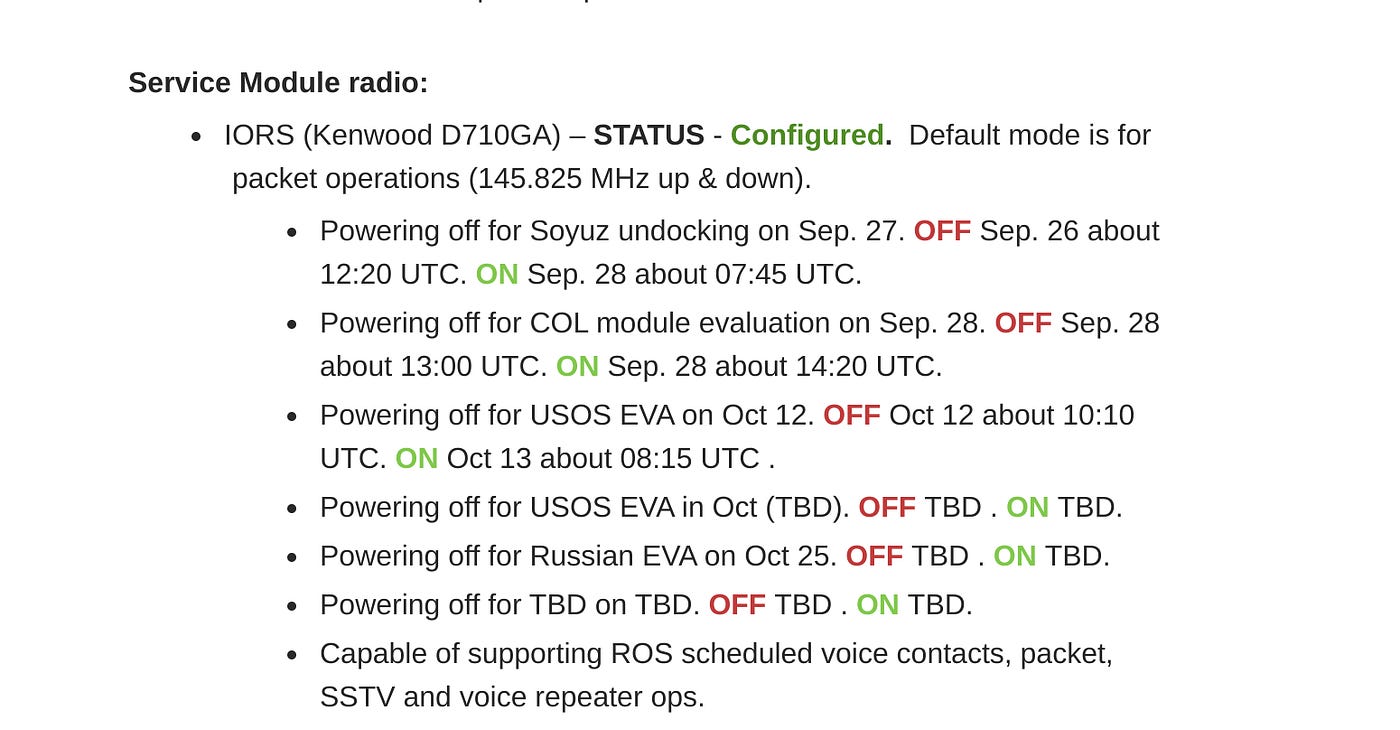
During the Pass:
It’s good practice to have your station set up a few minutes ahead of the pass to ensure any problems are uncovered prior to the pass commencing.
While SDR clients will vary, you’ll typically have access to a waterfall-type display and have the ability to record transmissions. Don’t forget to switch the record on prior to the pass so you’re able to log received transmissions into a saved data file. You’ll need this file for a future article so we can show you how to decode it using a plug-in.
To get a feel for how the transmitter sounds and works so you know to expect, watch this video for an audible explanation.
And we’ve included a screen shot below so you know what to look for on your waterfall display.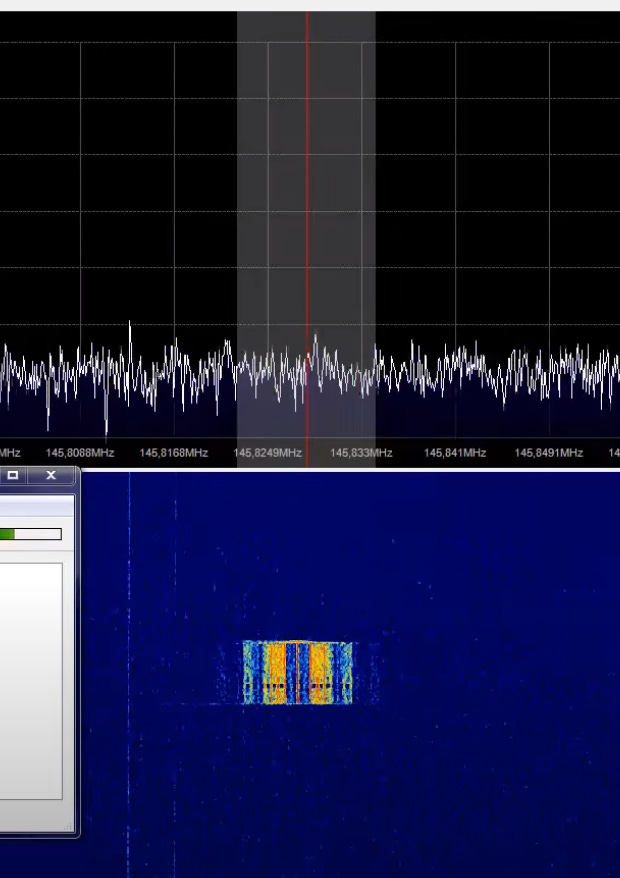
Short, sharp and effective. The transmission is strong and clear in the waterfall display. Source: Author
As we emphasized earlier it’s important to understand that signal strength and quality will vary depending on your station, distance of the ISS and even atmospheric conditions in some instances. To successfully receive you may need to troubleshoot your station. Generally, you’ll receive the strongest signal when the station is at orbital peak, so with a properly configured station you should be receiving strong signals for at least a short period.
Doppler: One Quick Word
The Doppler effect, when applied to space communications, is a phenomenon in which the frequency of electromagnetic waves, such as radio signals, appears to change as the source (e.g., a satellite or spacecraft) and the receiver (e.g., a ground station) move relative to each other.
When an object in space moves towards the observer, the waves get compressed, causing a higher observed frequency (upshift), while when the object moves away, the waves get stretched, resulting in a lower observed frequency (downshift).
This effect is crucial in space communication as it must be accounted for when calculating signal frequencies to ensure accurate and reliable data transmission between spacecraft and ground stations, especially when high velocities are involved. While we won’t cover that in-depth today, it’s an important concept to understand for future projects where it will be relevant.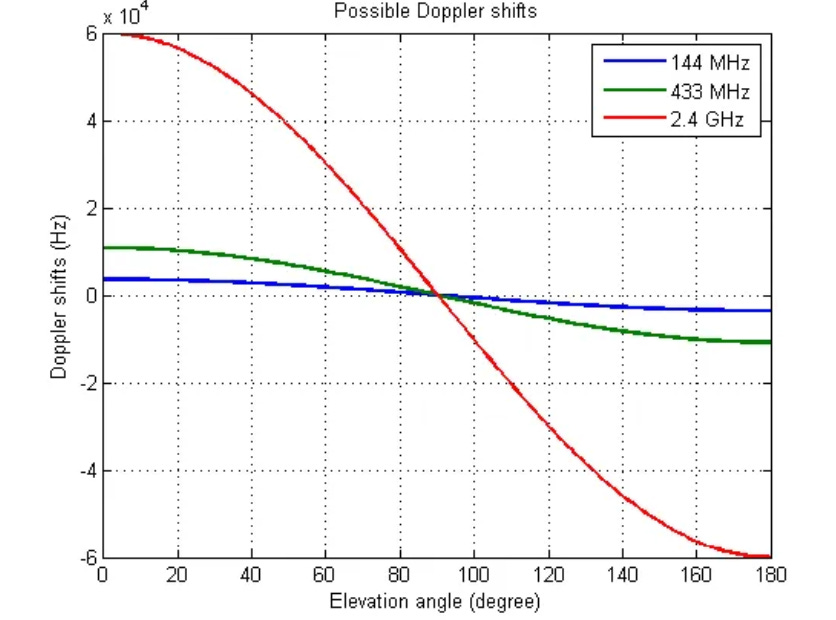
Doppler shift varies according to frequency, with higher shifts noticeable as frequency increases. Source: Wikipedia
In Closing:
As we bring today’s article to a close let’s do a quick recap on what we’ve learnt. At this point, we are starting to understand the concepts behind tracking an object in space and what we need to do to estimate a pass schedule for any location.
We also understand that we need to know our desired frequency and transmission type for interception purposes. And to future-proof our skills as we develop, we’ve introduced the concept of the Doppler effect on frequencies as well as having a rough idea of how orbital inclination and direction can affect our chances of properly receiving communications. Lastly, we’ve also looked at how to determine the status of our target and how we are able to check if the station is up for communication or not.
We’ll finish by including one last bonus point. Information is key to anything, particularly in the fields of information / cyber security and open-source intelligence. When we apply this to information gathering and radio hacking that revolves around space-based assets we soon realize that there’s a vast array of various types of satellites that are available for use. While we can look at the frequency band plan and focus the allocations for space communications, there is a better way.
The best way to look for this information is to look for catalogues on satellites and space assets and cross-check them to obtain information as needed. NASA has a vast array of information that’s publicly accessible for this and there are many civilian resources as well.
One of the best non-official sites for tracking this information is a site managed by a radio amateur. It has Launch, Frequency and Catalogue information for nearly all space-based assets, and includes recordings so you’ll know what to listen for. DD1US Sounds From Space is a valuable resource for those who are interested in pursuing space-based assets further.
Medium has recently made some algorithm changes to improve the discoverability of articles like this one. These changes are designed to ensure that high-quality content reaches a wider audience, and your engagement plays a crucial role in making that happen.
If you found this article insightful, informative, or entertaining, we kindly encourage you to show your support. Clapping for this article not only lets the author know that their work is appreciated but also helps boost its visibility to others who might benefit from it.
🌟 Enjoyed this article? Support our work and join the community! 🌟
💙 Support me on Ko-fi: Investigator515
📢 Join our Telegram channel for exclusive updates or.
🐦 Follow us on Twitter
🔗 Articles we think you’ll like:
- OSINT Unleashed: 5 Essential Tools for Cyber Investigators
- What the Tech?! GPS Technology
✉️ Want more content like this? Sign up for email updates here


