How to go about the Nibiru Chain Incentivized Testnet and also installing & running a NODE for it
 What is the Nibiru Chain?
Nibiru is a sovereign proof-of-stake blockchain, an open-source platform, and a member of a family of interconnected blockchains that comprise the Cosmos Ecosystem.
Tokenomics of the Nibiru Chain.
Where 60% is kept for the community.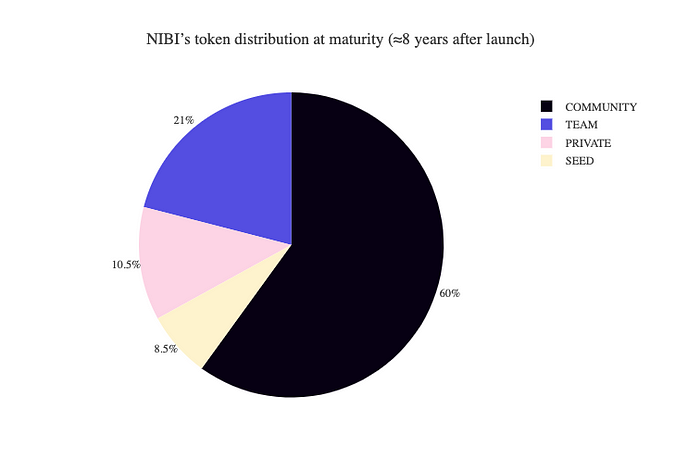
Let’s get and configure our VPS server:
A VPS, which I previously described, allows us to run our node in a Virtual Server. I’m sure you are familiar with what the word “Virtual” means; after all, what we are doing is on our laptop but not really on our laptop, if you think about it. So how do we get one? Running a node requires some really complicated procedures and even a complicated computer system.
go to: https://cutt.ly/p0zdTYb and then tap “SIGN UP” using your email address at the top.when choosing a password, don’t use any special characters if not it won’t work, use only numbers and letters (Capital and small letters) after that choose “private individual”
and choose a card as the payment option, you can get a USD card from chippercashapp.
Or, if you have a Master Card, you can just use that. You can also use Paypal. I used a card. After entering your card information, just continue. Your page should then look like the one in the image below.
Now tap on this link: https://cutt.ly/p0zdTYb and select “CLOUD VPS S” now to be 100 transparent with you guys this is my affiliate link, you can decide whether to use it or not, I would really appreciate it if you use it though. Thank you in advance.
 Next, choose CLOUD VPS S and choose 1 month and choose “European union.”
 Scroll down and choose “400GB SSD” and “UBUNTU 22.04.”
 Now here’s a part to pay attention to, scroll down and click on “GENERATE PASSWORD” now copy the password and save it on your note pad, don’t lose this password, please.
Now don’t touch any other thing just tap on “NEXT” On the next page, tap on “ORDER & PAY” on the next page you will see a payment processing message and you will be debited about $16.98 from your card if everything went well, next thing check your email.
 And you should have received your first email with a receipt of our payment immediately, open it and you can track your order from there, now you have to wait about 20 Mins at most for the second email which will come with your login details, after that open the second email.
And you will see the IP address given to you. Now that’s the most important thing on that email, now anywhere on this tutorial I ask you to use an IP address just know I’m talking about these numbers, your own will definitely be different from mine, so keep yours safe.
Now, let’s start to earn some points.
- Registration.
To register, you must submit all info required and complete the following tasks. Only registered users are eligible to participate in Nibiru’s incentivized Testnet.
Please note all tasks listed are mandatory for a successful registration. Completing tasks also grants you points (indicated as worth # of entries), which will help you claim rewards once the testing is over.
Registration link here.
- First Task: Paste your discord id with # too, example: chase#4444
- Second Task: So to get your Nibiru Address, Follow the steps:
- We need to install Keplr wallet extension in our browser.
- Go here and you will see the page like below, and click on ‘Add to Brave’.
 And the pop up will appear, click on ‘Add extension’.
 Click on this Sign which can be seen on the top right of your browser to see all your extensions.
 Click on ‘Pin’ button and it’ll pin the extension.
 After pinning the extension, you can get access of your wallet from here, click on this to create our wallet.
- Click on ‘Create new account’.
 After that you’ll page like this, and please save your ‘Mnemonic seed’ safely, this is key to your wallet. Fill all details, Account name, password and hit ‘Next’ button as shown in image below:
 You’ll see page like this, Now enter all the seed phrase in a correct order and hit ‘Register’ Button.
 If you see page like this, then congrats you created your new Keplr wallet.
Click on done and you’re browser will close.
- Now Go to this website: https://app.nibiru.fi/ and It’ll show you the pop up to add ‘Nibiru’ Network on your keplr wallet.
 Now that you have added Nibiru network in your keplr wallet, let’s get the address now.
- Click on this icon to open your wallet.

- As shown in the image, click on the ‘down arrow’ pointed with black arrow and scroll down to the bottom and you will see “nibiru-itn-1” Network, Select that.
 After selecting the address, you’ll see page like this, and the arrow pointed towards is your “Nibiru address”. This is what you should paste it in gleam section.
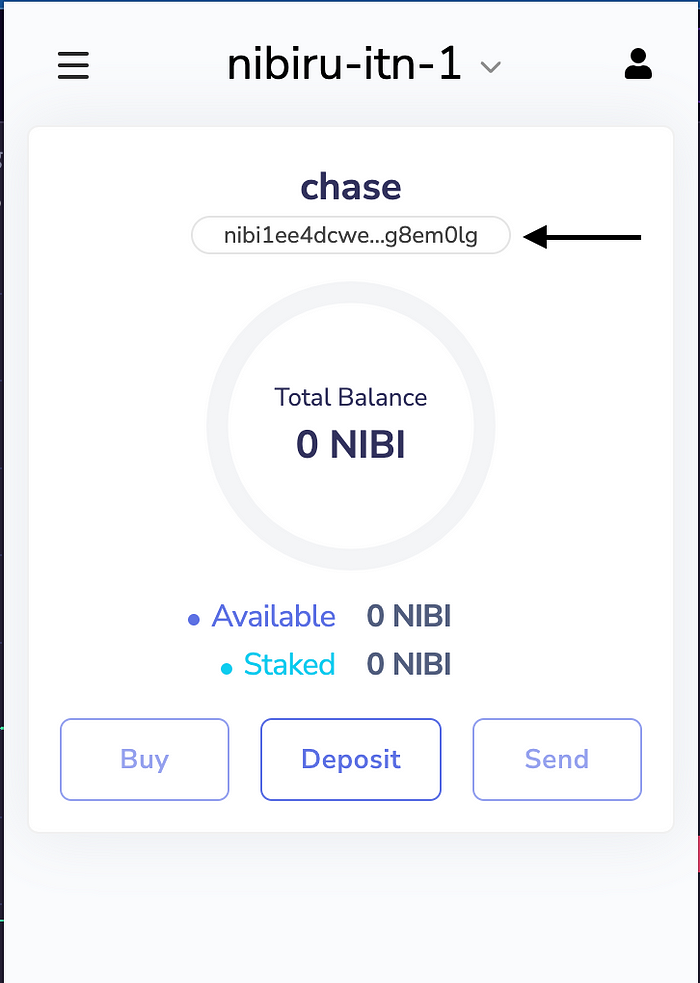 Paste like this and hit “Continue” Button.
 3. Third Task: Join their discord channel
4. Fourth Task: Follow Nibiru Chain twitter account.
5. Fifth Task: Retweet the mentioned tweet from Nibiru Chain. Now that you have completed all the task, your registration is successful, and you’ve bagged 77 points for Nibiru chain.
Let’s also gain some points for Delegators.
- Go to Nibiru website: https://app.nibiru.fi/ and connect your wallet.
 2. Click on faucet as shown in image below:
 3. You will see page like this and click on ‘Faucet’ button, then you’ll be get 11 NIBI,
 4. After getting faucet, let’s do the validators task to bag 100 more points.
Task 1: stake at least 1 NIBI to a validator
- Click on Stake button in https://app.nibiru.fi/ in this website.

- You will see page like this and click on the arrow button where the white arrow is pointed towards in the image below:

- Click on “Stake” button.

- Enter 1.2 and hit “Stake” Button.

- Click on “Approve” button.

- After approving if you see something like this then you successfully staked 1.2 NIBI to the validator.

Task 2: Re-delegate your stake from one validator to another validator.
- Select any other validator than you selected for the first time to stake your NIBI tokens. For me I selected ‘nibiru-0’ as my first validator to stake and now I’ll select any validator other than ‘nibiru-0’.

- Press on “Redelegate” button.

- Select your validator as shown in the image below:

- Type “1.1” and hit “Redelegate” button.

- Click on “Approve” button.
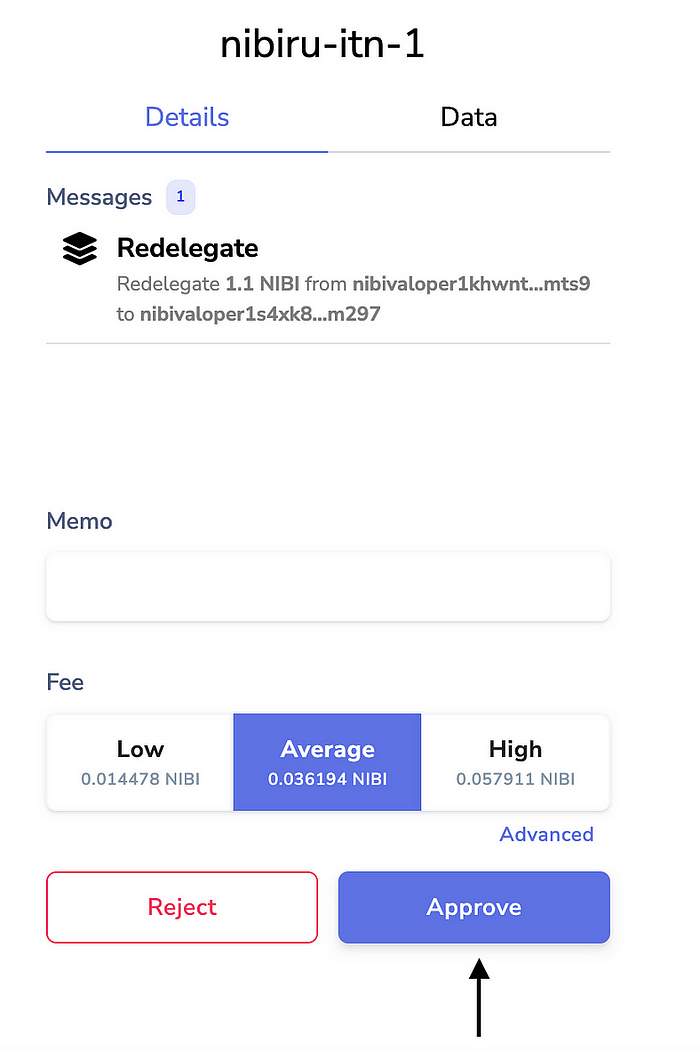
- After approving if you see something like this then you have successfully Redelegated 1.1 NIBI to another validator.

Task 3: Stake to an “Oracle” Validator
- Search ‘Oracle’ as shown in the image below and hit click on the arrow.

- Click on ‘Stake’ button.
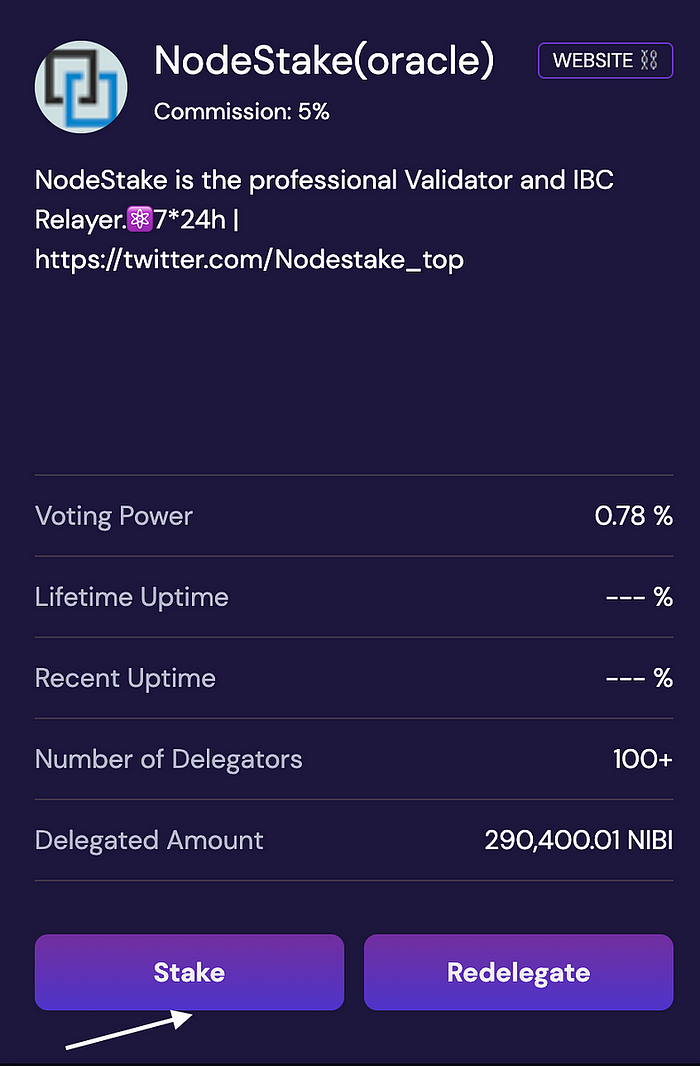
- Type 1.2 and hit “Stake” button.

- Click on “Approve” button.

- After approving if you see something like this then you successfully staked 1.2 NIBI tokens to oracle validator.

Task 4: Claim Rewards
- In this page, click on “Claim” button.

- Approve the transaction.

- After approving if you see something like this then you successfully claimed your reward.

Task 5: Unstake tokens.
- In ‘My validations’ Section, click on the “NodeStake(oracle)” validator.

- Click on “Unstake” button.

- Type 1.2 and press on “Unstake” button.

- Approve the transaction.

- After approving if you see something like this then you successfully Unstaked tokens from oracle validator.

Let’s go to discord to leave feedback of the testnet.
- Link to discord: Here
- Leave feedback in testnet channel.
Congratulation! All task for testnet is complete now and you bagged another 100 points.
Let's run Nibiru Node!
Now let’s jump to running the Nibiru Node in your new VPS, which requires us to open putty.
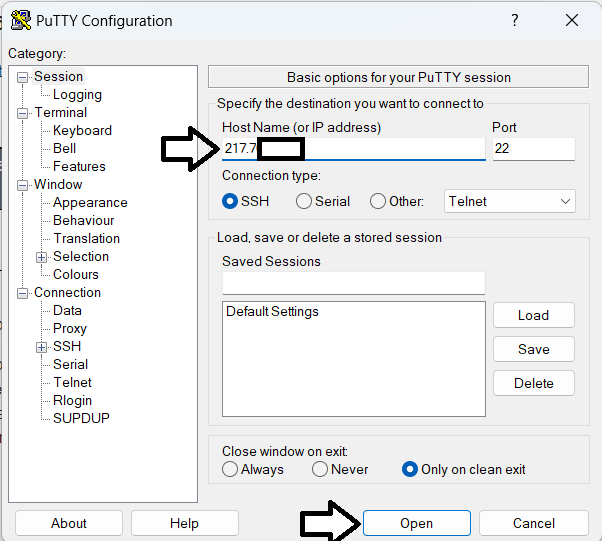
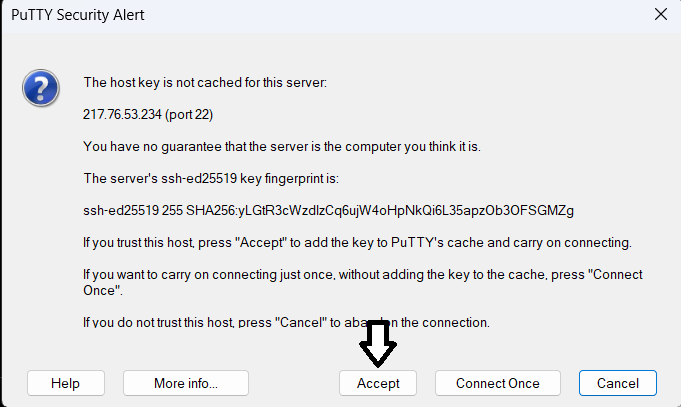
open your downloads and click on “open file” now remember the IP address of your VPS that we got my double clicking on our VPS? yes copy and paste it on the “Hostname” area and tap on open, if you get that warning sign just tap on “accept.”
 Your username is “root,” so enter that and press the enter key when prompted. When prompted for a password, remember the one that was sent to your email; copy it, paste it where prompted, and then press the enter key.
 Now if you waste time, it will bring up an error like the one below meaning it has logged you out no matter your progress in some cases, so you really need to be fast, it might not bring up something like this, but it will just show you inactive at the top of your screen, so you have to close the PuTTY app and open it again.
Now let me explain something for you, the remaining tutorial will be me giving you the code commands, all you need to do is copy and paste at the appropriate time, you can only paste code command when your VPS server allows it. As soon as you see something like “root@on……:” you can write otherwise you have to wait, if you don’t see something like this probably when you run a command, don’t try and write anything just wait, I repeat just wait., this applies to all the tutorial below.
now to paste code command all you have to do is to copy them from here and to paste any code command that you have already copied above, just right-click where you want to paste the code command on your VPS. JUST RIGHT CLICK ON THE PLACE YOU WANT TO PASTE IT AND IT WILL JUST APPEAR THERE.
Let’s move on; just copy and paste the code commands as I instruct you to do so to avoid problems.
If I were you, I would split my screen in half, with this medium article on one side and your putty open on the other, making it simple for you to copy and paste.
1. Paste this code in your putty or termius.
wget -q -O nibiru.sh https://api.nodes.guru/nibiru.sh && chmod +x nibiru.sh && sudo /bin/bash nibiru.sh
After pasting the command, it will prompt you to provide your validator name, you may use your own name as the validator name and press enter. The procedure will take about 5 minutes to finish, and once you see the image below, you can move on.
2. Now paste this in your terminal
source $HOME/.bash_profile
It won’t do anything, all it does is take you directly to another line, and that is perfectly fine.
3. Create wallet for our node.
nibid keys add wallet
It will ask for your wallet password after you’ve pasted this, so be sure to write it down. It will then create a wallet for you. Copy everything it gives you in return and store it securely in a notepad. Ensure the safety of your wallet by copying and pasting all relevant information.
4. Checking if our node is synchronized or not.
curl -s localhost:26657/status | jq .result.sync_info.catching_up
You need to wait for a while, for about 30 to 40 minutes, if it returns “TRUE,” which means that your node is not yet synchronized. Run the aforementioned command once more after some time has passed, and “FALSE” will be returned. If “True” is still returned, wait a while before trying again.
5. Transfer Funds from keplr to our node address.
- Remember, we saved our wallet info, this is your node Nibiru address, copy it.

- Go to keplr wallet,
- Click on send button.

- In the Recipient address, put address from your node, and in amount 8 and click on “Send”.
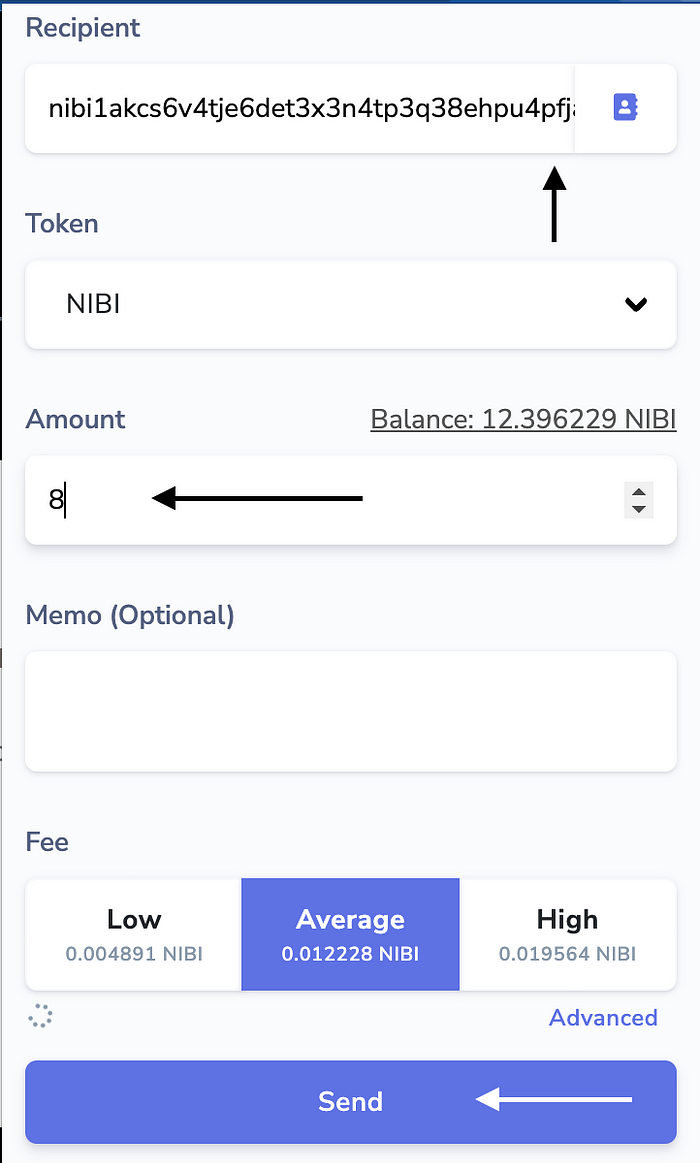
- Click on “Approve”.
 Once the transaction has been approved, let’s see if we have the nibi token in our node or not.
6. Checking balance.
nibid q bank balances YOUR_WALLET_ADDRESS
Change “YOUR_WALLET_ADDRESS” with the node address that we previously saved.
For example: this is my wallet address.
nibid q bank balances nibi1akcs6v4tje6det3x3n4tp3q38ehpu4pfja0kvk
 In the image above, take note of where I’m pointing; this represents the amount we transferred from Keplr to our node wallet.
7. Get valoper address
nibid keys show wallet --bech val -a
You will need to enter the password you entered for your wallet address, which I advised you to keep in mind. You’ll receive your valoper address after entering your password, keep this confidential.
8. Create our validator
nibid tx staking create-validator \
--amount=1000000unibi \
--pubkey=$(nibid tendermint show-validator) \
--moniker="$VALIDATOR" \
--chain-id=nibiru-itn-1 \
--commission-rate="0.1" \
--commission-max-rate="0.10" \
--commission-max-change-rate="0.01" \
--min-self-delegation="1000000" \
--fees=10000unibi \
--from=wallet \
-y
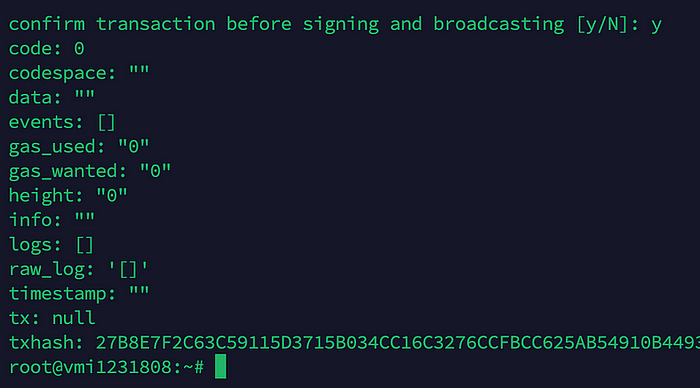
You will need to enter the password you entered for your wallet address, which I advised you to keep in mind.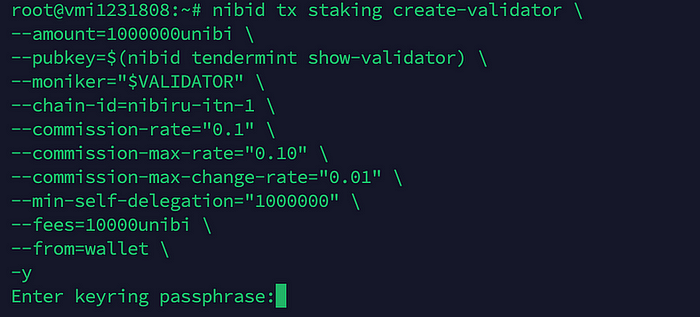 After successfully entering your password, you will see something similar to the image below.
9. Delegate more tokens to your valoper address.
Before copying this command, please replace “YOUR_VALOPER_ADDRESS” with your valoper address that we saved earlier.
nibid tx staking delegate YOUR_VALOPER_ADDRESS 6980000unibi --from wallet --chain-id nibiru-itn-1 --fees 5000unibi
For instance, mine look like this:
nibid tx staking delegate nibivaloper1akcs6v4tje6det3x3n4tp3q38ehpu4pfmxpdct 6980000unibi --from wallet --chain-id nibiru-itn-1 --fees 5000unibi
You will need to enter the password you entered for your wallet address, which I advised you to keep in mind. When prompted with the “Y/N” question after entering the password, type “Y” and press Enter.
 This is what you will see after pressing Y and Enter.
10. Checking if you successfully delegated or not
- Go to any browser of your choice.
- paste this: https://nibiru.exploreme.pro/validator/YOUR_VALOPER_ADDRESS
- Please replace “YOUR_VALOPER_ADDRESS” with your valoper address.
 The amount you delegated is shown here.
11. Let’s get validator role in discord
- Go here: discord link here.
- paste this: https://nibiru.exploreme.pro/validator/YOUR_VALOPER_ADDRESS
- Please replace “YOUR_VALOPER_ADDRESS” with your valoper address.
See the image below for reference:
- Paste your link like this and send it to discord, after some time you’ll be rewarded with validator role.
Congratulation! You have earned an additional 75 points for successfully deploying the NIBIRU NODE.
To ensure that your friends don’t miss out, kindly follow, like, retweet, and tag them in posts. Remember to turn on the posts as well. Thank you.
Twitter: (81) CHASE💀 (@Abrahamchase09) / Twitter
Also, join the TELEGRAM group to ask questions in case you get confused at any point.
GOODLUCK!


![[ℕ𝕖𝕧𝕖𝕣] 𝕊𝕖𝕝𝕝 𝕐𝕠𝕦𝕣 𝔹𝕚𝕥𝕔𝕠𝕚𝕟 - OM(G) , My Biggest Bag Was A Scam????](https://cdn.bulbapp.io/frontend/images/99de9393-38a8-4e51-a7ab-a2b2c28785bd/1)


